| How to draw Sasami Kawaii: |
|
Foreword: Here is a guide to draw Sasami Kawaii from "Tenchi Muyo!". |
||||
| 1. |
The basic shape is made of some polygons and a few lines as shown.
It's important to get the porportions right from the start. |

|
||||
| 2. |
Now that we have the proportions, we can start drawing Sasami's jaw and ears.
In character drawing, avoid using straight lines. Curve the lines slightly. It's a little hard and you need some pratice, but just keep on until you are satisfied with your lines. |
|
||||
| 3. |
Draw the eyelids and the mouth.
Draw the shadow of her nose as a little half circle. Note that you only need to draw the shadow when you see a character in a front view. |
|
||||
| 4. |
Draw the eyelids and the small eyelashes. The thickness of line you use for the upper eyelids should be twice as big as the lower eyelids.
Remember that the upper part of the iris is a light glare. It makes the eyes more lively. The big eyes give Sasami the super kawaii (cute) look. |
|
||||
| 5. |
Now that the face is almost done, we start on Sasami's hair.
The upper part of the polygon marks the top of her forehead. Start by drawing the two locks of hair on her forehead (the ones that go down over her eyebows). Then draw the top of her hair. Now you'll have two reference points to draw after when you draw the rest of her hair. Mark the sides of her head, by drawing two lines over her ears. Draw the hair jewels, the two long pony tails and the locks by her ears. |
|
||||
| 6. |
Finish drawing the hair and the hair jewels.
Add the forehead-emblem, freckles, cheeks and earfolds. Ink over the lines with a thin marker. Gently remove all pencil lines with an eraser. |
|
||||
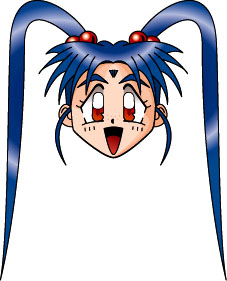
| 7. |
Color your drawing.
Start by giving her face a light skintone. Then fill some blue color into the hair, eyebrows and her forehead-emblem. Keep some light reflections in the hair, to make it look shiny. Put a shadow in the upper 1/3 part of her eyes. Color hairballs and eyes red, and her mouth and pupils dark red. That's it! |
|
||||
| Back to mainpage |